
Leighton
The temperature & humidity monitoring setup using a board & sensor kit is described on the page here. If you're not using the script at the bottom of this page then you'll need something like the second script (the one for that shares data to the screen). No need for the BH1750 or BMP085 libraries, although installing them won't do any harm (or any good using the kit).
You should also have a laser cut set of pieces to make a box to house the parts, along with the screws that are needed to fix things in place. You'll also need some glue to hold the screen mount & the sensor mount to the box.
The box itself is a press fit - there are tiny lugs on the joints which will make it a little hard to put together. Be careful not to snap the wood (support the pieces by putting your fingers close to the joints & hold things against the tabletop when you can).
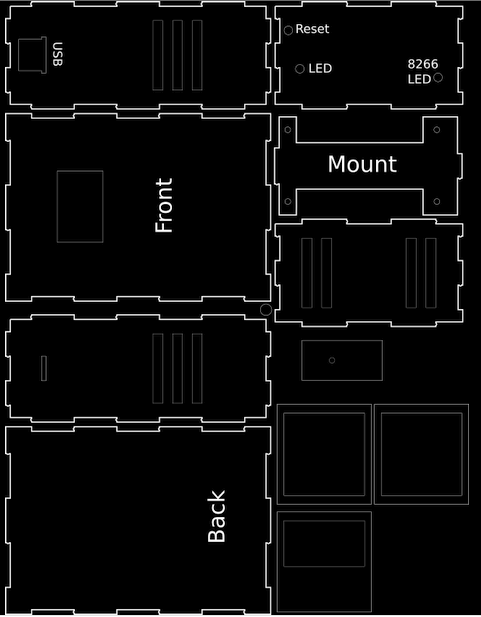
The labels should give you a clue about the position for each part. The text goes on the inside of the box, apart from the bottom piece which has the labels for the LEDs. That goes with the text facing outwards. (You could have the text on the outside for all/some of the pieces if you wanted, they're symmetrical)
The mount is for the arduino board & has a narrower pair of legs & a wider lug on one side - that fits in the side pieces so that the chips on the board are closest to the bottom of the box & the pins face upward (either side of the wood of the mount). You'll need to screw the board to the mount before you put it into the box. It wouldn't hurt to make the wiring connections to the board (only) before fixing the mount in place! That way you can more easily see which pin is which.
Note that the bottom (with the text about the LEDs) has the 2 holes at the end closest to the USB port.
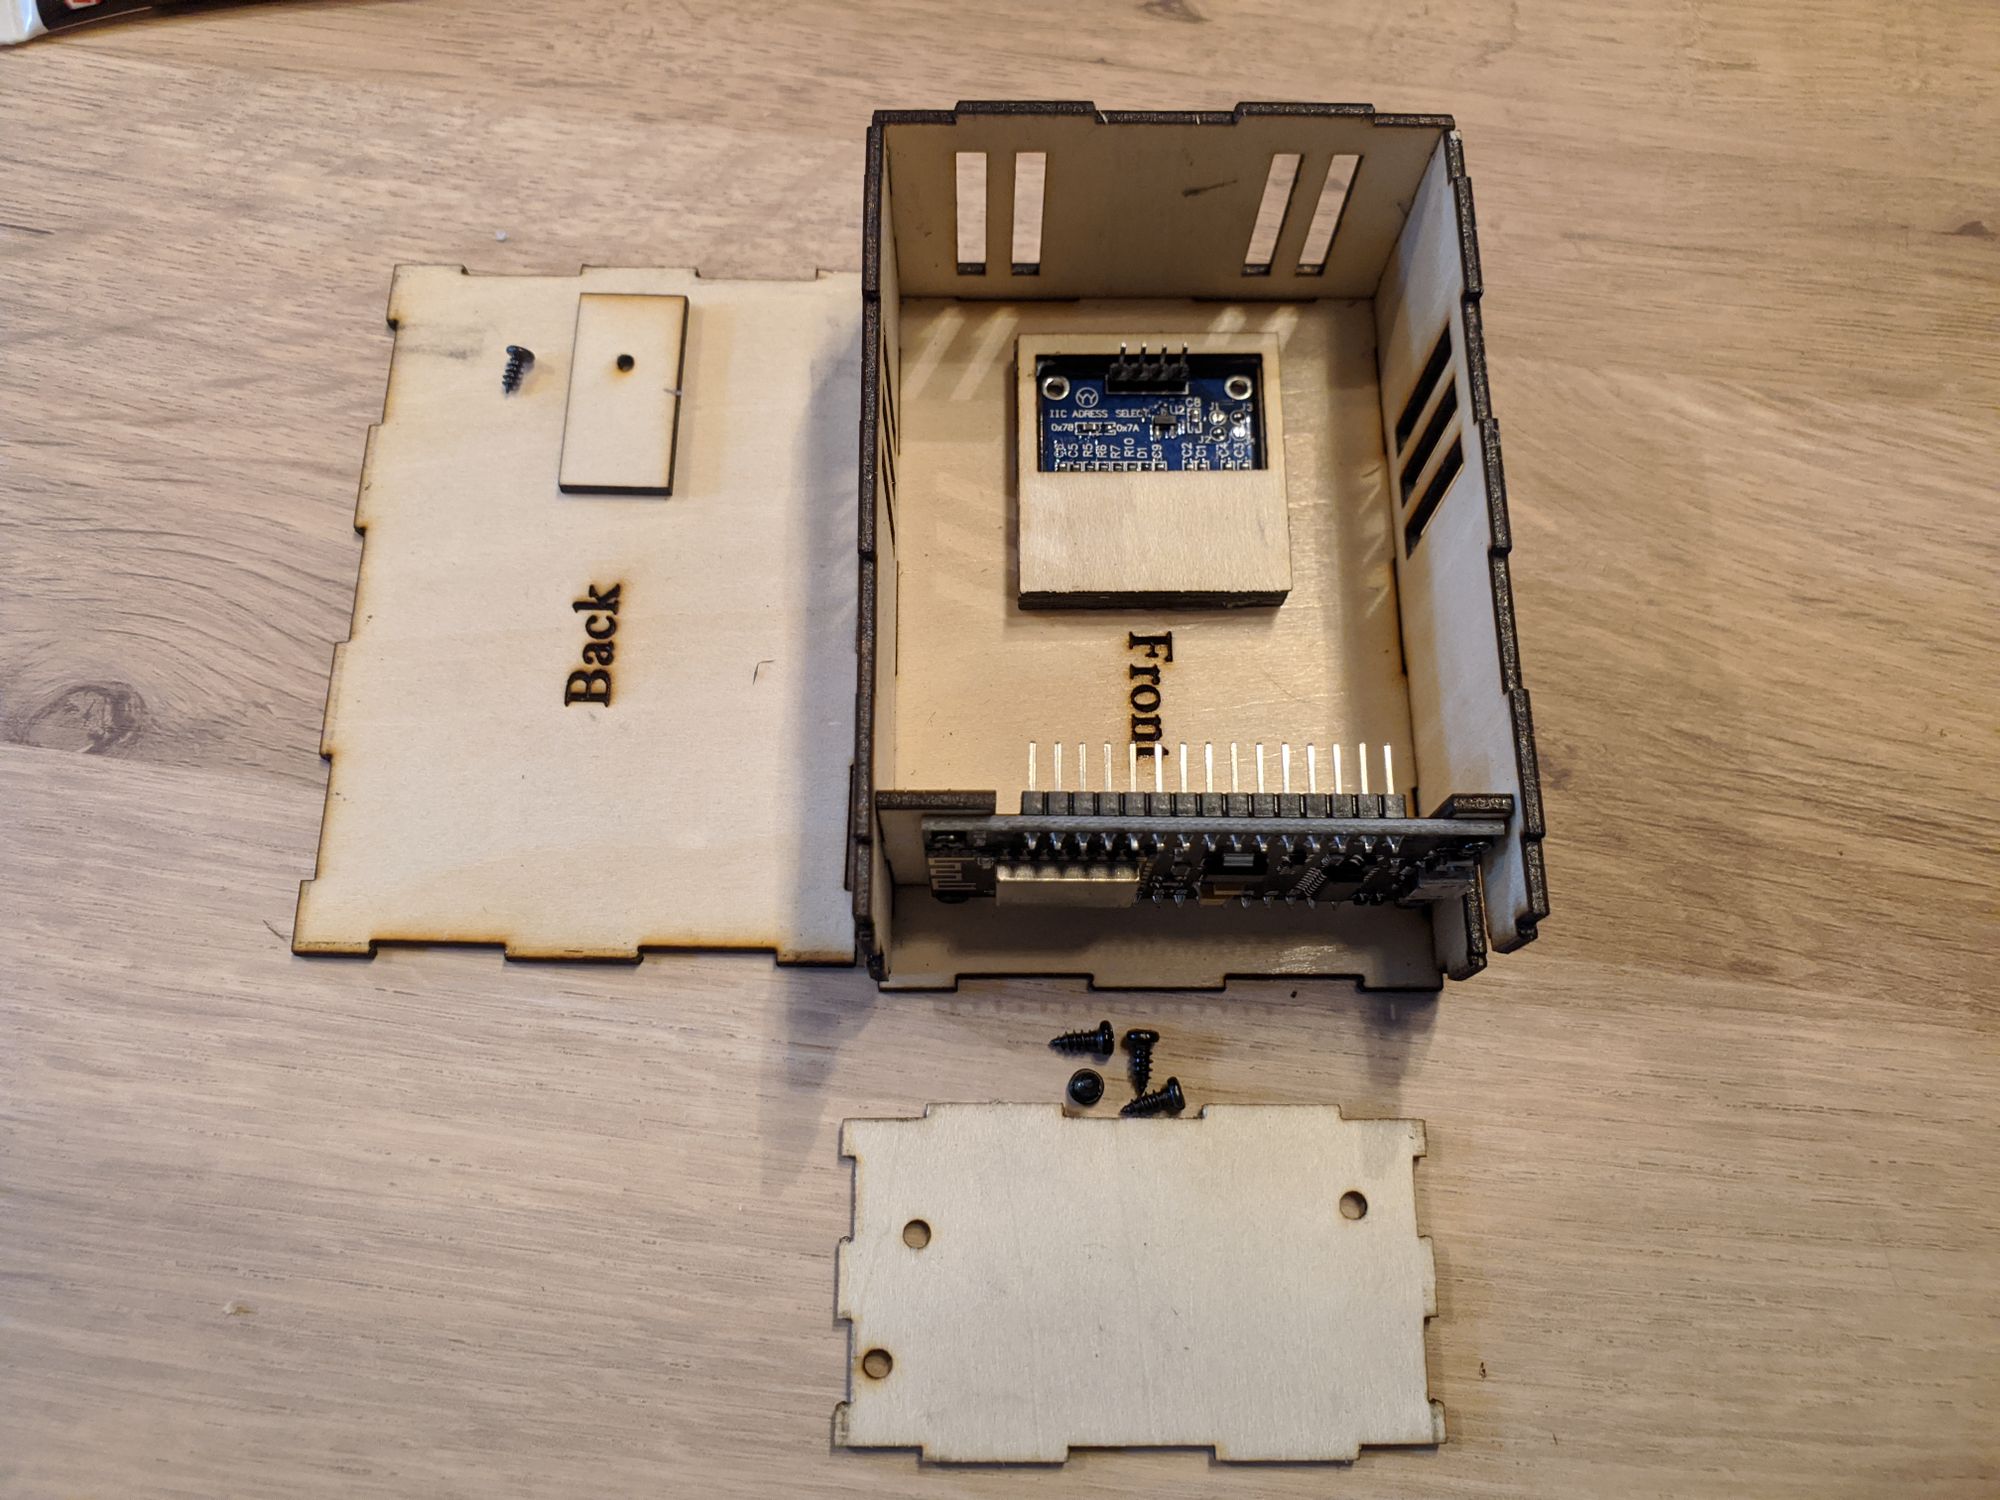
The sensor (with the blue box on it) is screwed to the small rectangular mount & then that needs to be glued to the back of the box. Somewhere fairly high up & ready for the wiring to be connected, but do the wiring last - after wiring the screen. You'll need to be ready to hold the back & then close the box once the wiring is done, so that's the last part of the assembly.
The screen mount has 3 parts - two identical rectangles & another with the same outside dimensions but a much smaller hole. Find the point the that screen shows best through the hole in the front of the box & glue the two rectangles so that they hold the screen in place when the box is vertical. Once you're found the right place you might want to pad the gap with something to stop it moving - the idea is that there is some wiggle room during assembly, to get things perfect!
Make a note of the labels on the screen's pins, so that you know which is which when you come to wire things up, then put the screen in place & then glue that last piece on, so that the pins are accessible through the hole.
Now you're ready to put the box (partially) together & then connect the wires to the screen & then wire up the sensor. Close the box up & use a USB cable to connect your computer to the electronics board.

Launch the Arduino IDE. Copy, paste & edit the sketch (the program) from the bottom of this page to get the WiFi details right:
const char* ssid = "MyWiFi";
const char* password = "MyWiFi";
& install it to the board. You should be able to see the LEDs confirming that everything is working & even press the reset button if needed.
Use the serial monitor (or your router's admin page) to find the IP address of your new sensor & you should be able to use that in a web browser to get a web page that shows you the temperature even when you can't see the screen - which should show you the information without needing to use a browser.
Then disconnect from the computer, move the sensor to its new home & plug it into a USB cabe connected to a wall socket.
Job done!
// Import required libraries
#include <Arduino.h>
#include <ESP8266WiFi.h>
#include <Hash.h>
#include <ESPAsyncTCP.h>
#include <ESPAsyncWebServer.h>
#include <Adafruit_Sensor.h>
#include <DHT.h>
#include <Ticker.h>
#include <AsyncMqttClient.h>
// Extra for display
#include <Wire.h>
#include <Adafruit_GFX.h>
#include <Adafruit_SSD1306.h>
// NTP time server
#include <time.h> // time() ctime()
//Time server to use
#define MY_NTP_SERVER "uk.pool.ntp.org"
#define MY_TZ "GMT0BST,M3.5.0/1,M10.5.0"
// Replace with your network credentials
const char* ssid = "MyWiFi";
const char* password = "MyWiFi";
//server ID
#define SERVER_ID "Leighton"
#define DHTPIN 0 // Digital pin connected to the DHT sensor (marked D3 on the board!)
#define SCREEN_WIDTH 128 // OLED display width, in pixels
#define SCREEN_HEIGHT 64 // OLED display height, in pixels
#define SCREEN_ADDRESS 0x3C // For the Geekcreit 1306 displays
#define OLED_RESET -1
// Uncomment the type of sensor in use:
#define DHTTYPE DHT11 // DHT 11
//#define DHTTYPE DHT22 // DHT 22 (AM2302)
//#define DHTTYPE DHT21 // DHT 21 (AM2301)
// Mosquitto MQTT Broker IP address
#define MQTT_HOST IPAddress(192, 168, 0, 1)
// For a cloud MQTT broker, type the domain name
//#define MQTT_HOST "example.com"
#define MQTT_PORT 1883
// MQTT Topics
#define MQTT_PUB_TEMP SERVER_ID "/dht/temperature"
#define MQTT_PUB_HUM SERVER_ID "/dht/humidity"
//////////////////////////////////////////////////////////////////////
//
//You should be OK to leave everything from here down without editing
//
//////////////////////////////////////////////////////////////////////
// Initialize DHT sensor
DHT dht(DHTPIN, DHTTYPE);
//Initialise display
// SDA = pin D2
// SCL = pin D1
Adafruit_SSD1306 display(SCREEN_WIDTH, SCREEN_HEIGHT, &Wire, OLED_RESET);
// Variables to hold sensor readings
// current temperature & humidity, updated in loop()
float t = 0.0;
float h = 0.0;
// Misc toggles
bool d = true;
bool wifi = false;
bool mqtt = false;
// Set up Time
time_t now; // this is the epoch
tm tm; // the structure tm holds time information in a more convient way
AsyncMqttClient mqttClient;
Ticker mqttReconnectTimer;
WiFiEventHandler wifiConnectHandler;
WiFiEventHandler wifiDisconnectHandler;
Ticker wifiReconnectTimer;
// Create AsyncWebServer object on port 80
AsyncWebServer server(80);
// Generally, you should use "unsigned long" for variables that hold time
// The value will quickly become too large for an int to store
unsigned long previousMillis = 0; // will store last time DHT was updated
// Updates DHT readings every 10 seconds
const long interval = 10000;
void connectToWifi() {
Serial.println("Connecting to Wi-Fi...");
WiFi.begin(ssid, password);
}
void onWifiConnect(const WiFiEventStationModeGotIP& event) {
Serial.println("Connected to Wi-Fi.");
connectToMqtt();
//set Wifi Indicator
wifi = true;
}
void onWifiDisconnect(const WiFiEventStationModeDisconnected& event) {
Serial.println("Disconnected from Wi-Fi.");
mqttReconnectTimer.detach(); // ensure we don't reconnect to MQTT while reconnecting to Wi-Fi
wifiReconnectTimer.once(2, connectToWifi);
//Set Wifi Indicator
wifi = false;
}
void connectToMqtt() {
Serial.println("Connecting to MQTT...");
mqttClient.connect();
}
void onMqttConnect(bool sessionPresent) {
Serial.println("Connected to MQTT.");
Serial.print("Session present: ");
Serial.println(sessionPresent);
// Set MQTT indicator
mqtt = true;
}
void onMqttDisconnect(AsyncMqttClientDisconnectReason reason) {
Serial.println("Disconnected from MQTT.");
// Set MQTT indicator
mqtt = false;
if (WiFi.isConnected()) {
mqttReconnectTimer.once(2, connectToMqtt);
}
}
void onMqttPublish(uint16_t packetId) {
digitalWrite(2, LOW); // Turn the ESP module LED on by making the voltage LOW
Serial.print("Publish acknowledged.");
Serial.print(" packetId: ");
Serial.println(packetId);
digitalWrite(2, HIGH); // Turn the ESP module LED off by making the voltage HIGH
}
const char index_html[] PROGMEM = R"rawliteral(
<!DOCTYPE HTML><html>
<head>
<meta name="viewport" content="width=device-width, initial-scale=1">
<link rel="stylesheet" href="https://use.fontawesome.com/releases/v5.7.2/css/all.css" integrity="sha384-fnmOCqbTlWIlj8LyTjo7mOUStjsKC4pOpQbqyi7RrhN7udi9RwhKkMHpvLbHG9Sr" crossorigin="anonymous">
<style>
html {
font-family: Arial;
display: inline-block;
margin: 0px auto;
text-align: center;
}
h2 { font-size: 3.0rem; }
p { font-size: 3.0rem; }
.units { font-size: 1.2rem; }
.dht-labels{
font-size: 1.5rem;
vertical-align:middle;
padding-bottom: 15px;
}
</style>
</head>
<body>
<h2>ESP8266 DHT Server</h2>
<p>
<i class="fas fa-thermometer-half" style="color:#059e8a;"></i>
<span class="dht-labels">Temperature</span>
<span id="temperature">%TEMPERATURE%</span>
<sup class="units">°C</sup>
</p>
<p>
<i class="fas fa-tint" style="color:#00add6;"></i>
<span class="dht-labels">Humidity</span>
<span id="humidity">%HUMIDITY%</span>
<sup class="units">%</sup>
</p>
</body>
<script>
setInterval(function ( ) {
var xhttp = new XMLHttpRequest();
xhttp.onreadystatechange = function() {
if (this.readyState == 4 && this.status == 200) {
document.getElementById("temperature").innerHTML = this.responseText;
}
};
xhttp.open("GET", "/temperature", true);
xhttp.send();
}, 10000 ) ;
setInterval(function ( ) {
var xhttp = new XMLHttpRequest();
xhttp.onreadystatechange = function() {
if (this.readyState == 4 && this.status == 200) {
document.getElementById("humidity").innerHTML = this.responseText;
}
};
xhttp.open("GET", "/humidity", true);
xhttp.send();
}, 10000 ) ;
</script>
</html>)rawliteral";
// Replaces placeholder with DHT values
String processor(const String& var) {
//Serial.println(var);
if (var == "TEMPERATURE") {
return String(t);
}
else if (var == "HUMIDITY") {
return String(h);
}
return String();
}
void show(float temp,float hud) {
//display.drawBitmap(0, 5, img, 48, 50, 1)
if (d = true) {
display.setTextSize(1);
display.setCursor(3,0);
display.setTextSize(2);
// Show the time
time(&now); // read the current time
localtime_r(&now, &tm); // update the structure tm with the current time
String tm_str;
tm_str = String(tm.tm_hour);
int length = tm_str.length();
if (length <2) display.print("0");
display.print(tm.tm_hour); // hours since midnight 0-23
display.print(":");
tm_str = String(tm.tm_min);
length = tm_str.length();
if (length <2) display.print("0");
display.print(tm.tm_min); // minutes after the hour 0-59
display.setTextColor(WHITE);
display.setTextSize(2);
display.setCursor(62,20);
display.printf("%.1f", temp);
display.print("C");
display.setCursor(52,30);
display.print(hud);
display.println("%");
display.setCursor(2,40);
display.setTextSize(1);
if (wifi == true) {
display.print("Wifi");
} else {
display.print(" ");
}
display.print(" ");
if (mqtt == true) {
display.print("MQTT");
} else {
display.print(" ");
}
display.setTextSize(1);
display.setCursor(73,0);
tm_str = String(tm.tm_mday);
length = tm_str.length();
if (length <2) display.print("0");
display.print(tm.tm_mday); // day of month
display.print("/");
tm_str = String((tm.tm_mon + 1));
length = tm_str.length();
if (length <2) display.print("0");
display.print(tm.tm_mon + 1); // January = 0 (!)
display.print("/");
tm_str = String(tm.tm_year + 1900); // Years since 1900
length = tm_str.length();
tm_str = tm_str.substring(length - 2);
display.print(tm_str);
display.display();
display.clearDisplay();
}
}
void setup() {
// Serial port for debugging purposes
Serial.begin(9600);
// Give us a chance to get things running
delay(2000);
// Initialize the I2C bus
// On esp8266 devices you can select SCL and SDA pins using Wire.begin(D4, D3);
Wire.begin();
Serial.println("Starting up...");
pinMode(2, OUTPUT); // Initialize GPIO2 pin (ESP module LED) as an output
// Start the DHT11 sensor readings
dht.begin();
// Start up the display
if(!display.begin(SSD1306_SWITCHCAPVCC, SCREEN_ADDRESS)) {
Serial.println(F("SSD1306 allocation failed"));
d = false;
// for(;;); // Don't proceed, loop forever
} else {
// Show initial display buffer contents on the screen --
// the library initializes this with an Adafruit splash screen.
display.display();
delay(2000); // Pause for 2 seconds
// Clear the buffer
display.clearDisplay();
}
wifiConnectHandler = WiFi.onStationModeGotIP(onWifiConnect);
wifiDisconnectHandler = WiFi.onStationModeDisconnected(onWifiDisconnect);
mqttClient.onConnect(onMqttConnect);
mqttClient.onDisconnect(onMqttDisconnect);
mqttClient.onPublish(onMqttPublish);
mqttClient.setServer(MQTT_HOST, MQTT_PORT);
// If your broker requires authentication (username and password), set them below
//mqttClient.setCredentials("REPlACE_WITH_YOUR_USER", "REPLACE_WITH_YOUR_PASSWORD");
//Start the NTP time conction
configTime(MY_TZ, MY_NTP_SERVER);
connectToWifi();
// Print ESP8266 Local IP Address
Serial.println(WiFi.localIP());
// Route for root / web page
server.on("/", HTTP_GET, [](AsyncWebServerRequest * request) {
request->send_P(200, "text/html", index_html, processor);
});
server.on("/temperature", HTTP_GET, [](AsyncWebServerRequest * request) {
request->send_P(200, "text/plain", String(t).c_str());
});
server.on("/humidity", HTTP_GET, [](AsyncWebServerRequest * request) {
request->send_P(200, "text/plain", String(h).c_str());
});
// Start server
server.begin();
}
void loop() {
unsigned long currentMillis = millis();
if (currentMillis - previousMillis >= interval) {
// save the last time you updated the DHT values
previousMillis = currentMillis;
// Read temperature as Celsius (the default)
float newT = dht.readTemperature();
// if temperature read failed, don't change t value
if (isnan(newT)) {
Serial.println("Failed to read from DHT sensor!");
}
else {
t = newT;
Serial.println(t);
// Publish an MQTT message on topic MQTT_PUB_TEMP
uint16_t packetIdPub1 = mqttClient.publish(MQTT_PUB_TEMP, 1, true, String(t).c_str());
Serial.printf("Publishing on topic %s at QoS 1, packetId: %i ", MQTT_PUB_TEMP, packetIdPub1);
Serial.printf("Message: %.2f \n", t);
}
// Read Humidity
float newH = dht.readHumidity();
// if humidity read failed, don't change h value
if (isnan(newH)) {
Serial.println("Failed to read from DHT sensor!");
}
else {
h = newH;
Serial.println(h);
// Publish an MQTT message on topic MQTT_PUB_HUM
uint16_t packetIdPub2 = mqttClient.publish(MQTT_PUB_HUM, 1, true, String(h).c_str());
Serial.printf("Publishing on topic %s at QoS 1, packetId %i: ", MQTT_PUB_HUM, packetIdPub2);
Serial.printf("Message: %.2f \n", h);
}
//delay(1000);
show(t,h); // show data on screen
}
}